 Manage Areas
Menu Option: Area : Manage Areas
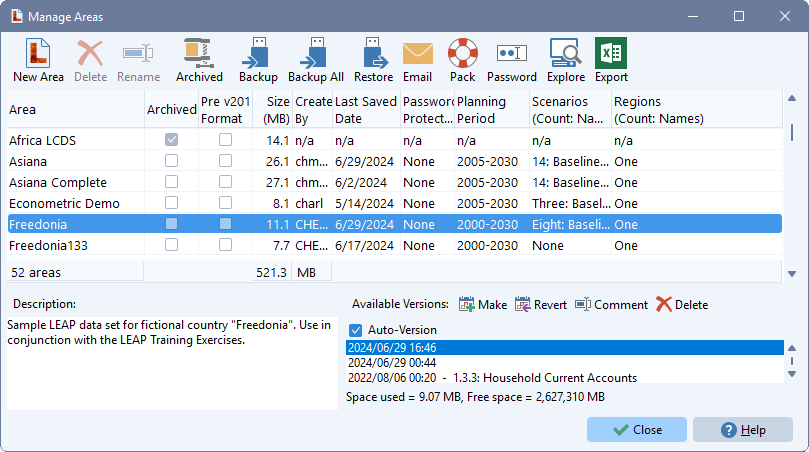
Use the Manage Areas screen (Main Menu: Area: Manage Areas), to create, delete, and organize the data sets (Areas) on your computer. The Manage Areas screen is divided into three panes. The table in the top pane shows the areas installed on your computer. Below you can view and edit notes associated with each area, and manage the backup versions of areas (see below).
Top Panel
The top table contains the following columns:
-
Name: the name of the area.
-
Zipped: a check mark indicating whether the area is currently zipped (i.e. compressed into a single "zip" file). You can double-click a check mark to zip or unzip an area.
-
Created By: the user who originally created the area (on older format data sets, this will be marked "unknown").
-
Last Saved By: the user who last saved changes to the area.
-
Last Saved: the date when changes were last saved.
-
Password: the password-protection status of the area: none, required to edit, or required to open.
Toolbar
The Manage Areas toolbar gives access to a variety of options for managing areas:
-
New Area: Use this option to create a new Area data set. You can create one based only on the default data, or you can create it as a copy of an existing Area.
-
 Delete: Use this option to delete an area. NB: deleted areas are permanently deleted from your hard-disk, and unless previously backed-up, cannot be restored.
 -
 Rename: Use this option to rename a folder.
 -
 Archived: Use this option to compress an entire area's data files into a single ".leap" file.
 -
 Backup Use this option to make a back-up copy of an area. The area will first be archived into a single .LEAP file. You can backup to any drive or folder on your PC or on a local area network connected to which you are connected. The Backup All function can be used to backup all areas in bulk.
 -
 Restore from... Use this option to restore a previously backed-up data set, or to install an area sent to you by another person. You will be prompted to select the name of a .leap or .zip file. LEAP will check the file to ensure that it is a valid LEAP area.
 -
 Email: Use this to send a copy of an area to another person as a .leap file attached to an email.
 -
 Pack: Use this option to pack the data files of an area, removing unused space and compacting the data files.
 -
 Password: Use this option to add, change or delete passwords for protecting access to an area. If an area already has a password, you will be prompted to enter the current password, before you can enter as new password. Note: for password-protected areas, the delete, repair and rename options require that you first enter a password.
 Explore: Use this option to open Windows File Explorer showing the folder containing an area's files.
 Export: Use this option to export a list of areas to Excel.
LEAP saves multiple versions of areas, in case you decide you want to go back to a previous version of your data. Backup versions of areas are automatically created when the area is saved. Previous versions are placed in the _backup folder and named with the area name and the backup date and time. For example, a version of FREEDONIA from 2.30 PM on March 2, 2015 would be named freedonia_2015_3_2_14_30.zip.
As versions accumulate, LEAP will selectively and automatically delete some of the saved versions, balancing the need to keep previous versions, with the need to preserve hard disk space. Several versions will be preserved from the previous 24 hours, plus one per day for the last seven days, one per week for the last month, one per month for the last year, and one per year before that. Note: LEAP will never automatically delete a version that has a comment. You may also manually create a version from the Area: Make Version menu option ( ) and give it an optional comment. It is useful to create named versions at important milestones in a project. For example, once you have finished entering the Current Accounts for an area, you might create a version with the comment "Current Accounts complete." As another example, suppose you had just finished a study and written a paper, you might create a milestone version, with the comment "Data set corresponding to finished paper."
The bottom-right part of the Manage Areas screen lists any available backup versions for the area selected in the top table and allows you to manage these backups. The panel has its own toolbar containing three options:
-
Make: Use this option to create a new saved version. You can optionally give it a name.
-
 Revert: This option lets you revert to a previously backed-up version of a data set. Use this option with care as it will overwrite the current version of your data set.
-
Comment: allows you to edit the comment associated with a saved version of an area. For example, you may wish to mark versions made after important events such as project milestones.
-
Delete: deletes a version.
-
Auto-Versioning: Use this check box to globally enable or disable the automatic creation of versions. We strongly recommend leaving this option enabled.
Notes
-
The Make and Revert options are also available directly from the Area menu of the main screen.
-
The Backup function creates backup copies of an Area in any selected disk or folder. Backups record the current state of the area but can also optionally include the information in earlier versions. For more information see the topic describing the Backup function.