 Import From Excel
Menu Option: Analysis: Import from Excel
See also: Export to Excel, Pasting Data from Excel, Create Branches from Excel
Use this option in conjunction with the Export to Excel option to import large amounts of data into LEAP from a previously saved Excel template spreadsheet. Depending on how the spreadsheet has been set-up this function will either directly import LEAP expressions entered in Excel, or it will import values stored in columns of the spreadsheet, with each column representing one year of data. Each row of the spreadsheet refers to the data associated with one branch/variable/region/scenario.
- If the spreadsheet contains values stored in columns, then these will be imported and converted into time-series expressions in LEAP using either the Interp, Step or Smooth functions based on the label you specify in a column of the spreadsheet.
- If the spreadsheet contains LEAP expressions, then these will either be imported into LEAP or LEAP will create links to these expressions using the Excel(Filename, Rangename) function.
Before using the Import From Excel option you must first create and open a spreadsheet in Excel containing the data you wish to import. This spreadsheet must be strictly formatted with the names of branches as the rows of the spreadsheet and the annual values to be imported as columns. Various other data are also required in the spreadsheet. The only practical way to create such a spreadsheet is to first use the Analysis: Export to Excel menu option to create a blank template spreadsheet. Once you have exported a template spreadsheet it is easy to add or delete columns for different years, or to remove the rows representing certain branches/regions/scenarios/variables for which you do not wish to import data.
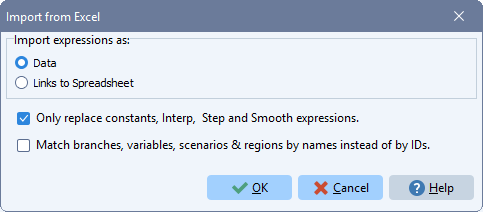
The Import from Excel feature has a number of user-selected options:
- Importing as Data or as Links: When importing, you will be asked whether you wish these expressions to be created as links to the original Excel spreadsheet, or to directly import the data into LEAP. Creating the expressions as links to Excel may be useful if you wish to do most of your editing work in Excel, or if you wish to conduct additional Excel modeling outside of LEAP. However, it reduces the transparency of your expression in LEAP.
- Spreadsheet Values Only Replace Interp and Step Functions: When importing data arranged as columns of yearly values, this option will prevent LEAP from overwriting complex expressions in your LEAP area. Only simple numbers, Interp and Step functions will be overwritten.
- Use Expression Inheritance Where Possible: With this options, which is checked by default, when importing an expression into a particular branch/variable/region/scenario, if that imported expression is the same as the one that comes from the scenario or region inheritance logic, then LEAP will not specifically write the expression for the scenario/region, but will make use of the inherited expression. This reduces the tendency for unnecessary extra expressions in your models.
Notes
-
What Sheet is Imported? LEAP always imports from the current open Excel spreadsheet. If you have multiple Excel sheets open, switch to the one you want to import then use the Alt-Tab shortcut keys to switch back to LEAP before starting to import.
-
Importing Scaling Factors and Units: When importing data, LEAP will also import and update the scaling factors and numerator and denominator units associated with most variables. Thus, you can use Excel to edit both data and also scaling factors and units. This can be particularly useful if you wish to change the scale or units of many branches at the same time (e.g. if changing the currency unit for a whole study). All you need to do is (1) export a variable from LEAP to Excel, (2) change the units by copying and pasting ranges of cells in Excel, then (3) re-import the spreadsheet. Note however, that in LEAP, scaling factors and units apply across all scenarios and across both Current Accounts data and all scenarios. Hence LEAP will only import edits to scaling factors and units specified for Current Accounts in the first region. Any edits made to scaling factors and units for other regions or scenarios will be ignored.
-
Importing from Filtered Excel Spreadsheets: By default, LEAP's export option will set up a spreadsheet that can be easily filtered to show only selected branches, variables, regions or scenarios. You can use the auto-filter buttons in the spreadsheet to selectively hide rows of the spreadsheet. However, when importing, LEAP will import data from all rows of the spreadsheet, whether they are visible or not.
-
How the Import option works: In order to work correctly, the import function needs to match-up the rows in the spreadsheet with the data stored in LEAP for a given branch, variable, scenario and region. It is important to understand that during the import LEAP does NOT normally make use of the names stored in the branch path column or the variable, region and scenario names columns. Instead it makes use of 4 hidden columns on the far left of the spreadsheet (columns A-D) that contain unique ID codes used for these items in LEAP. Note however that you can optionally import based on the names in the branch path column. This is not normally recommend though as it tends to be less reliable than using the branch IDs on the left of the sheet.
-
Please bear these points in mind:
-
-
You should back-up your LEAP data sets before importing any data.
-
We strongly suggest that you do not edit any of the hidden ID codes. Editing these codes may cause unpredictable results and can even cause your LEAP data to become corrupted and unusable. Bear in mind also that you cannot add rows to the sheet. LEAP can only import data that corresponds to an existing branch/variable/region/scenario,
-
You can safely delete rows in the spreadsheet. LEAP simply imports any remaining contiguous rows that exist in the spreadsheet.
-