 Scenarios
Menu Option: General: Scenarios (also available on the Main Toolbar)
See also: Scenarios, Understanding Expression Inheritance, Analysis View
Use the Manage Scenarios screen to create, delete, organize and set the properties of the scenarios in a LEAP area.
Understanding Expression Inheritance
Nearly all data in LEAP are specified as expressions for a given variable at a given branch in the LEAP tree. These expressions are entered in LEAP's Analysis View and different expressions can be entered for different scenarios (or for different regions in a multi-region area). To minimize data entry requirements and to make data management as easy as possible, scenarios are organized in a hierarchy so that you need only enter data in one scenario if it differs from the data entered in its parent (ancestor) scenario. Before describing the scenario manager, it is important to first understand the way that expression inheritance works in LEAP since this is fundamental to understanding how scenarios help you manage data. See Understanding Expression Inheritance for more information.
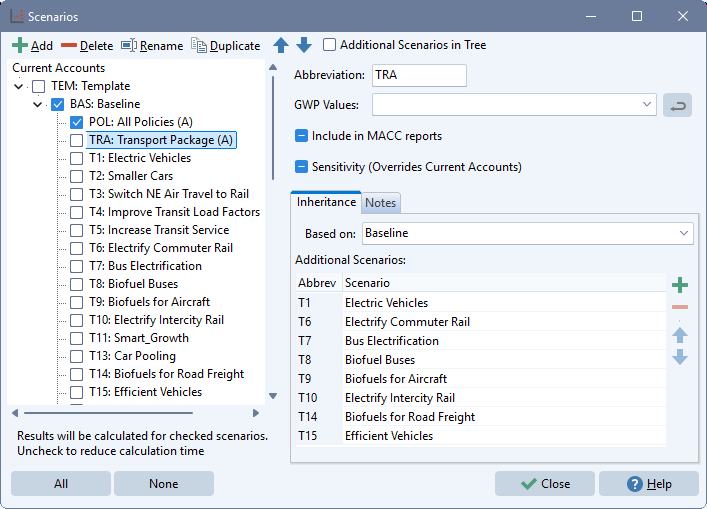
Using the Scenario Manager
The Scenario Manager screen is divided into three different areas. On the left, the Area's scenarios are listed in a hierarchical tree showing the main scenario inheritance structure. Click on a scenario in the tree to edit it or to add a new scenario beneath it. Use the tree check boxes to set whether you want results to be shown for each scenario (in the Results, Energy Balance, Overviews and Summaries views). Unchecking a scenario will speed-up calculations, but prevent you from seeing its results. Unchecking a scenario will not erase any data associated with the scenario - it simply omits the scenario from results calculations. Use the All and None buttons at the foot of the screen to quickly check or uncheck all scenarios. On the top right of the screen, you can edit various additional properties of each scenario as follows:
-
Abbreviation: You can edit a short name (abbreviation) for each scenario.
-
GWP Values: Here you can view and optionally override the default set of global warming potential (GWP) values used in each scenario's GHG emissions calculations. By default, LEAP's GHG emissions calculations use whatever GWP values are specified in the General: Effects screen. You can override these values to do a sensitivity calculation that shows the differences in overall GWP that arises from the use of GWP values corresponding to different IPCC assessment reports (ARs). Use the GWP Values selection box if you want to select GWP values corresponding to a specific IPCC AR. LEAP includes GWP values from all five of the IPCC ARs. The GWP Values setting is inherited across scenarios. Thus, if you pick an AR setting for Current Accounts, all other scenarios will use the same AR values unless you specifically override that setting in a descendant scenario.
-
Include in MACC Reports: Here you can select which scenarios are include in the special Marginal Abatement Costs Curve (MACC) summary reports. You should only include scenarios that represent individual policies and measures; not integrated scenarios that represent a combination of scenarios.
-
Sensitivity (overrides Current Accounts): In some case you may want to use scenarios to represent a sensitivity analysis. Normally in LEAP, all scenarios share the same Current Accounts values. However, in a scenario marked as a sensitivity, the expressions entered in a scenario are allowed to override the Current Accounts scenario.
-
Notes and Inheritance: Below these properties, are two tabs used to edit the Notes associated with each scenario and its scenario Inheritance hierarchy. In the Inheritance tab, use the Based On selection box to change the main parent of the scenario, and use the Additional Scenarios box to edit the additional scenarios from which the active scenario inherits. Note that you can change the order of inheritance for additional scenarios, using the up (
 ) and down (
 ) buttons. At the bottom of the tab, the current expression search order is displayed for the currently selected scenario. This search order will be automatically updated any time you edit the scenario inheritance structure.
The Tool Bar
The tool bar at the top of the Scenario Manager gives you additional tools for managing scenarios:
-
 Add is used to add a new scenario, immediately under the current scenario.
 -
 Delete is used to delete a scenario. Bear in mind that deleting a scenario, will also delete all data associated with that scenario.
 -
 Rename lets you change the name of a scenario.
 -
 Duplicate is used to make a copy of a scenario with a different name.
 -
The up (
) and down () buttons are used to adjust the order of the scenarios as displayed in the scenario tree. Note that this has no effect on calculated results. -
The Show Additional Scenarios check box toggles the display in the scenario manager tree. When unchecked, scenarios with additional (multiple) levels of inheritance are marked with an (A) indicator. When checked, the tree text is expanded to list the abbreviations of all additional scenarios that the highlighted scenarios inherits from.